Accessing files from your smartphone and uploading them wherever necessary is an easy task but creating such an interface may not be. However, if you are committed to getting the entire codebase and learning the process, this tutorial blog is the right place to achieve this.
Developers of React Native app development company start with a basic app and move forward embedding different features in it. Let’s get into its detailed explanation.
Pre-acquired knowledge and learnings
As I discussed, you have to start this project with a basic React Native app. After the process, you can easily make a separate file in your code editor to add the ‘File Access’ features to your app.
Before interacting with the React Native framework, you need to install software like Visual Code editor, Android Studio, Node.js, and others. I have a separate blog dedicated to ‘Setting up the React Nativ environment’.
Third-party React Native library support
I think the increasing inclination of developers toward React Native framework is because of its third-party library support. If you are wondering what is it about? It is nothing but a package that you can install either through the npm command or the yarn command. Basically, its benefit is to make the app much lighter, reducing development costs as well as time. You can easily integrate the already pre-tested React Native components into your project without spending time building it again. This way you can focus on other important operations.
Let us see what third-party library you will need in this project. It is react-native-document-picker. It is an RN wrapper from which you can import the component DocumentPicker and use it in the codebase. You can anyway store other libraries in the form of devDependencies in the package.json folder but you have to call the libraries in the app.js folder for their further use.
Getting into the code syntax: App.js folder
Using import statements to get components
For this, you have to use the following lines to start with the codebase.
import {Button, StyleSheet, Text, View, Image, Dimensions} from ‘react-native’;
import React, {useState} from ‘react’;
import DocumentPicker from ‘react-native-document-picker’;
Here, you can see that you will need Button, StyleSheet, View, Image, Text, Dimensions, React, useState, DocumentPicker from the relevant React Native libraries. Although I will not be using all these components in this current project, this is the way you have to import the components and use them in the codelines.
The most important component for this project is the DocumentPicker, which you have to call from the react-native-document-picker.
Implementing DocumentPicker components and useState hook
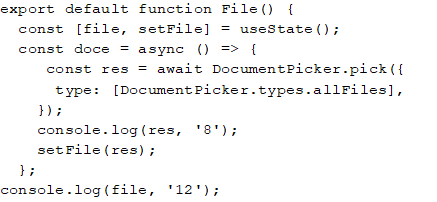
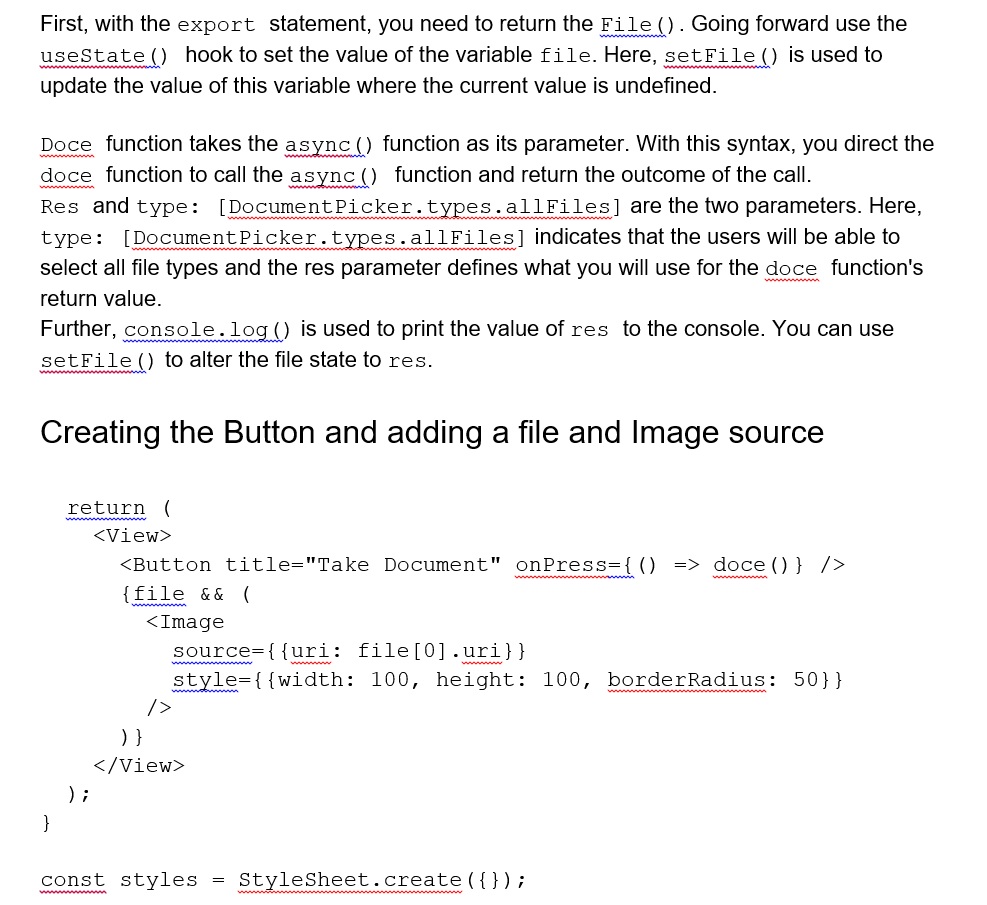
To get the Button and integrate a source to it requires a <View></View> element. You have to write the return() function and then enclose both the Button and Image components under it. Refer to the above syntax for how I have achieved this.
You also need to add a title for the clickable button. For this project, I have added ‘TAKE DOCUMENT’. Also, I have used an onPress prop to call the doce() function.
Here, {{uri: file[0].uri}} is the Image source and you design the code in a manner that it will load the foremost image from the specified file.
You can add style parameters to the selected file. Look at the way I added the parameter of height, width, and borderRadius to it.
You either or not can use the StyleSheet for further detailing. In this project, I have just mentioned the syntax but have not used it. Don’t worry, this won’t give any error output.
Now let’s see the process of testing the app.
Running the ‘File Access’ app on the emulator
Go to the command prompt and run npm install. After that, run npx react-native run-android. Both these commands will help you to start the virtual device and eventually the app.
As soon as your emulator starts, you will get a screen similar to image 1.

Press the blue button to go straight to your device’s local directory where you can find all the documents saved. Note that, you should have some files stored prior in your system or device. As you click on any of the files or images, it will show in a new screen ( refer to image 2).
Image 2
To wrap up
Learning a new tool or framework may be difficult at the initial phase but as you start practising it, you will get a hang of it and start loving the process. This tutorial blog and building a ‘File Access’ interface can be a next milestone in your journey as a developer.
Happy coding!!!.